How to Choose an MP3 Quality Setting When Extracting Audio from Video
You drag a video into the converter, select MP3, and the page asks a question you weren't expecting: 128 kbps, 192 kbps, 320 kbps — or something called VBR? Most people guess. Half of them pick the biggest number and walk away with a file three times larger than it needs to be. The other half accept the default and find out weeks later, on decent headphones, that the cymbals in their favorite live recording sound like someone crinkling a plastic bag.
Neither group was careless. They just never had the numbers explained in terms of what they actually buy you. That's what this guide does. By the end, you'll know which setting fits a lecture, which fits a music video, when the maximum quality is storage well spent, and when it's dead weight.
Why Does Your MP3 Quality Choice Matter So Much?
Every MP3 sits on a seesaw. One end is fidelity — how close it sounds to the original recording. The other end is file size — how much storage it eats and how long it takes to send, sync, or back up. Bitrate is the lever between the two, and the choice you make in that dropdown is permanent.
Permanence is the part people miss. MP3 is a lossy format: the encoder throws away audio data it predicts you won't notice, and there is no setting, app, or service that can put that data back later. If you under-encode, the damage is baked in. Your only fix is to go back to the source video and extract again — assuming you still have it. If you deleted the video to save space, you live with the artifacts forever.
The opposite mistake costs you too, just more quietly. A 45-minute lecture encoded at 320 kbps stereo takes up about 108 MB. The same lecture at 96 kbps mono takes roughly 32 MB and sounds identical, because a single talking voice barely stresses an MP3 encoder. You've paid three times the storage for nothing. Worse, if the video's original audio track was heavily compressed to begin with, a top-shelf MP3 setting can't recover any of that lost quality — you just wrap the same losses in a bigger file.
So the "best" setting doesn't exist as a single number. It comes out of two questions you can answer in ten seconds. First: what's in the audio? Speech and music stress an encoder in completely different ways. Second: what's it for? A file destined for archival, a podcast feed, and your gym playlist have very different requirements. The rest of this guide turns those two answers into specific numbers.
What Actually Determines MP3 Audio Quality?
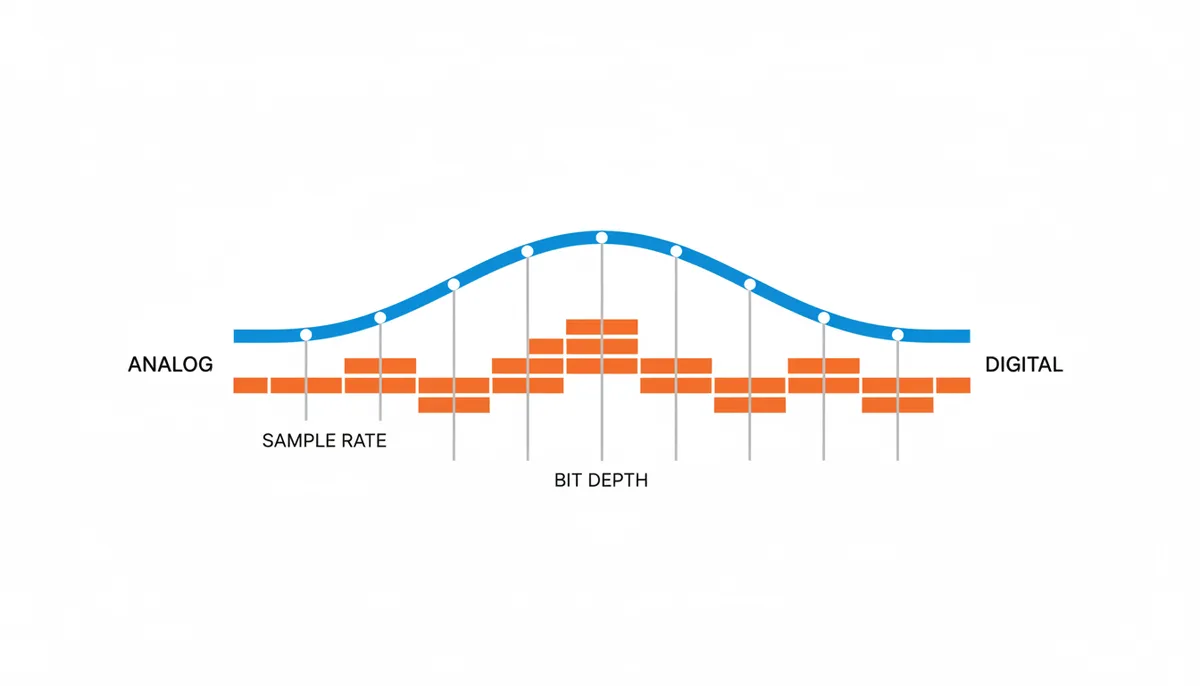
Strip away the jargon and three numbers describe any piece of digital audio: bitrate, sample rate, and bit depth. They measure different things, and only one of them is the dial you'll usually touch.
Bitrate is the one that matters most, and it's the one in your converter's dropdown. It measures how much data the file spends per second of sound, in kilobits per second (kbps). Think of it as a budget: every second of audio gets an allowance of data to describe itself, and more data buys a more accurate description. The math is simple — 128 kbps works out to 128 × 60 ÷ 8 = 960 kilobytes per minute, call it a megabyte a minute. A 320 kbps file spends two and a half times that.
Sample rate is how many snapshots per second the converter takes of the soundwave. CD audio uses 44.1 kHz — 44,100 snapshots a second. Video soundtracks are usually 48 kHz. The Nyquist-Shannon sampling theorem sets the rule here: the highest frequency you can capture is half the sample rate, so 44.1 kHz tops out at 22.05 kHz. That's comfortably above the roughly 20 kHz ceiling of young, healthy human hearing — and most adults stop hearing well below that.
Bit depth is how precisely each of those snapshots records loudness. The 16-bit depth of a CD allows about 96 dB of dynamic range — the distance between silence and the loudest undistorted sound. Studio work happens at 24-bit (about 144 dB). One wrinkle worth knowing: MP3 files don't have a fixed bit depth at all. The format stores frequency information, not raw samples, and your player reconstructs the waveform when decoding. So if a converter offers you a bit depth setting for MP3 output, it's describing an intermediate step, not a property of the final file.
Now the crucial part: MP3's whole trick is psychoacoustics — the science of what human hearing actually perceives. The format, developed at the Fraunhofer Institute and standardized by MPEG in the early 1990s, exploits a phenomenon called masking. A loud sound makes nearby quieter sounds inaudible — a kick drum hit drowns out a soft guitar note for a few milliseconds, and a deep bass synth hides a faint hi-hat close to it in pitch. The encoder analyzes the audio, finds everything that would be masked anyway, and deletes it. At high bitrates this works remarkably well. At low bitrates, the encoder runs out of budget and starts deleting things you can hear.
One principle sits above all of this: the source audio is the ceiling. If your video's embedded audio track is 126 kbps AAC — typical for a lot of web video — then every flaw that compression introduced is already there before you convert anything. Extracting to a 320 kbps MP3 cannot restore a single detail. You get a bigger file carrying the same limitations, plus whatever the new lossy pass shaves off on its way out.
Constant vs. Variable Bitrate (CBR vs. VBR): Which Should You Use?
Once you know roughly how many kilobits per second you want to spend, the next question is how to spend them: evenly, or intelligently?
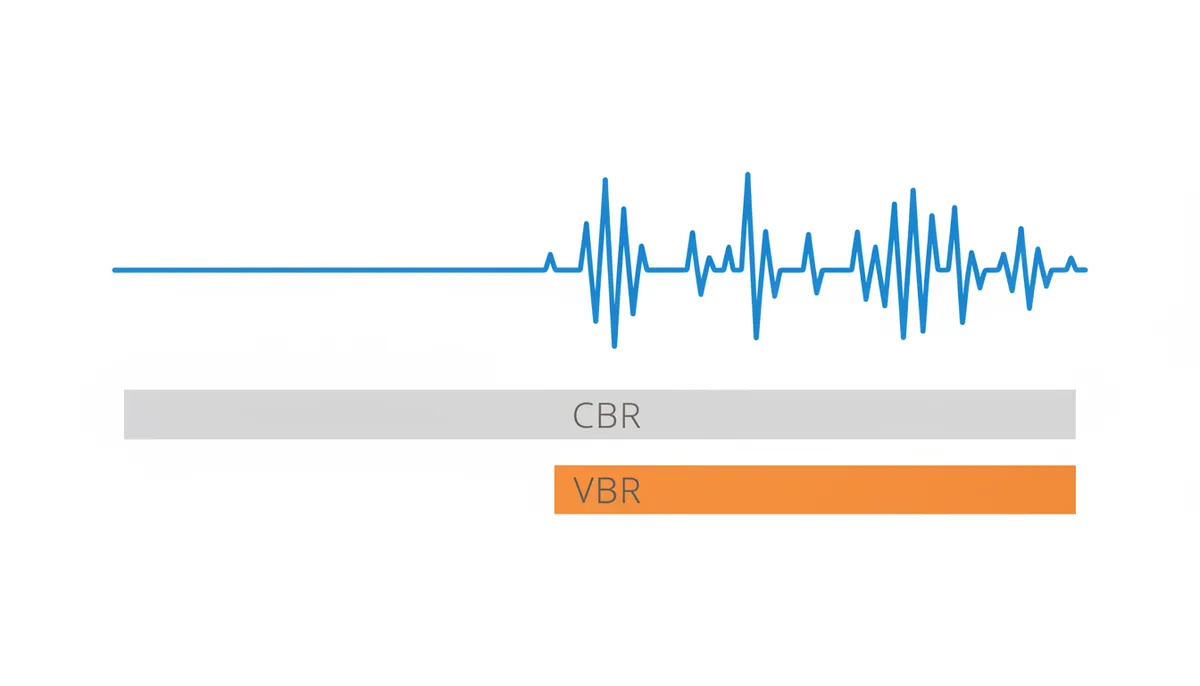
Constant Bitrate (CBR) gives every single second of audio the same data allowance, from the opening silence to the loudest chorus. The payoff is predictability — file size is bitrate × duration ÷ 8, down to the kilobyte, which matters if you're streaming over a fixed-bandwidth connection or need to know exact sizes in advance. The cost is efficiency. Three seconds of silence gets the same budget as three seconds of a full orchestra. The silence wastes bits; the orchestra starves for them.
Variable Bitrate (VBR) flips the logic. Instead of a fixed data budget, you set a quality target, and the encoder spends whatever each moment requires. Quiet or simple passages get a thin stream of bits; dense, complex passages get a flood. The widely used LAME encoder exposes this as a scale from V0 (highest quality, averaging roughly 245 kbps) down to V9 (smallest). V2, averaging around 190 kbps, has been a community favorite for music for years. For the same perceived quality, VBR generally produces a smaller file than CBR, because the encoder simply stops paying for silence and simplicity.
There's also a hybrid, Average Bitrate (ABR), which lets the budget float but reins it in to hit a target average. It's a genuine middle option, though VBR at a well-chosen quality level usually beats it for pure listening.
My recommendation is uncomplicated: use VBR for almost everything. Personal libraries, archiving, sharing, podcast files — VBR wins on quality per megabyte across the board. Reach for CBR only when something in your chain demands it: an old car stereo or MP3 player that displays wrong track lengths or stutters on VBR files, broadcast or streaming setups with fixed bandwidth budgets, or any workflow where you must guarantee the file size before you start. Anything built in the last decade handles VBR without a hiccup, so treat CBR as the compatibility fallback, not the default.
How Do You Match the Bitrate to Your Audio's Content?
This is where most advice falls apart, because it hands you one number as if a spoken lecture and a symphony were the same problem. They aren't. Here's what actually works, by content type.
Voice-Only Content: Lectures, Interviews, Podcasts
Speech is astonishingly cheap to encode well. Almost everything that makes a voice intelligible sits below 8 kHz, the pattern of human speech is predictable, and your brain actively reconstructs missing detail — the same reason phone calls work. That means the encoder needs far less data before artifacts become audible.
For stereo speech, 96–128 kbps VBR is the sweet spot. For a single microphone — one person at a desk, a dictaphone, a voice memo — switch to mono and 64–96 kbps sounds just as clean, because you're not paying for a second channel that carries nothing. This isn't theoretical: a large share of published podcasts ship at exactly these rates. Run the math on that 45-minute lecture again: 96 kbps mono, about 32 MB, and every word crisp. Push below 64 kbps stereo or 48 kbps mono, though, and voices start turning warbly and robotic, with "s" sounds dissolving into static. That's the floor.
Music: The Sweet Spot
Music is where encoders earn their budget. Sustained harmonics, a wide stereo image, high-frequency percussion, sudden dynamic shifts — all of it demands data, and all of it exposes shortcuts. The vulnerable spots are cymbals, hi-hats, acoustic guitar, live crowd noise, and anything with complex reverb tails.
For most listeners on most equipment, 192–256 kbps VBR — LAME's V2 to V0 range — is the sweet spot. Over years of blind listening tests in audio communities, the consistent finding is that most people stop being able to reliably tell a well-encoded V2 MP3 from the lossless original on typical gear. Trained ears on revealing equipment sometimes still can, which is exactly what the next tier exists for. At 128 kbps, music remains perfectly serviceable for background listening, phone speakers, and noisy environments — but put on closed-back headphones and the cymbals start to shimmer in ways the original never did.
Critical Listening and Archiving
At the top sit 320 kbps CBR and V0 VBR. These settings give the encoder enough budget that its psychoacoustic deletions stay comfortably below the threshold of audibility, even on difficult material. Use this tier when the file is going into a permanent music library, when you listen on high-end headphones or a real stereo, when the audio will feed further production work, or when you simply never want to redo the extraction. The honest trade-off: you're paying double the storage of V2 for a difference most people, in most situations, cannot hear. For gym earbuds, car speakers, or a laptop's built-in drivers, that money buys nothing — the noise floor of your environment masks everything first.
One cap applies to all three tiers: never exceed what the source can support. If the video's audio track is 128 kbps AAC — and you can check this in a tool like VLC's codec information panel — then 192 kbps MP3 is your sensible ceiling. Higher settings just pad the file.
| Audio content | Recommended setting | How it sounds | File size per 3 minutes |
|---|---|---|---|
| Voice, single mic (lecture, voice memo) | 64–96 kbps VBR, mono | Clean, natural speech; artifacts inaudible | ~1.4–2.2 MB |
| Speech, stereo (interviews, podcasts) | 96–128 kbps VBR | Voices crisp and present | ~2.2–2.9 MB |
| Background listening (phone speaker, car) | 128–160 kbps VBR | Good enough for noisy environments | ~2.9–3.6 MB |
| Music, everyday listening and sharing | 192–256 kbps VBR (V2–V0) | Transparent for most listeners on most systems | ~4.3–5.8 MB |
| Critical listening / archiving | V0 VBR or 320 kbps CBR | Effectively indistinguishable from the source | ~5.5–7.2 MB |
Reading the table is straightforward: find the row that matches your content and your destination, and take its setting. If you land between two rows, pick the higher one. Storage is cheap and regret is permanent — but as the first and last rows show, "higher" doesn't always mean "320."
What About Sample Rate, Channels, and Other Advanced Settings?
Bitrate gets all the attention, but two quieter settings in the advanced panel can cut your file size in half — or quietly damage the result if you touch them without understanding them.
Sample Rate: Match the Source, Never Upsample
The rule is one line long: match the original. Audio embedded in video is almost always 48 kHz; music ripped from CD is 44.1 kHz. Keep whatever you have. Upsampling — converting 44.1 kHz to 48 kHz "for quality" — invents nothing; you cannot synthesize treble detail that was never captured. You just get a larger file. Downsampling the other way is a legitimate tool in exactly one situation: speech-only content. Dropping a lecture to 22.05 kHz halves the sample data while keeping everything the human voice needs, with headroom to spare.
One behavior worth knowing so it doesn't alarm you: MP3 encoders resample automatically at low bitrates. Below roughly 96 kbps stereo, expect the output to drop to 32 kHz or 22.05 kHz, because at those budgets there's no point encoding frequencies you can't afford to describe. At 128 kbps and above, 44.1 and 48 kHz are preserved.
Channels: Stereo, Joint Stereo, and Mono
Joint stereo is the default in every competent MP3 encoder, and it deserves to be. Instead of encoding left and right channels fully independently, it stores the information both channels share once, then adds a compact description of how they differ. Most music has enormous overlap between channels — vocals, bass, and drums usually sit dead center — so joint stereo frees up a meaningful chunk of the budget for actual detail. At 128 kbps and above, it is for practical purposes indistinguishable from full discrete stereo.
Mono is the most underused setting in the whole panel. If the recording is a single microphone in front of one person, the stereo file contains two identical channels — you're paying double for nothing. Downmixing to mono and encoding at 64 kbps gives you voice quality comparable to 128 kbps stereo at literally half the size. For a podcast interview or lecture archive, that's the correct move.
When not to downmix: anything with real stereo content. Music, ambient recordings, live concerts, binaural audio — collapsing these to mono destroys spatial information you can't get back. And before you flatten an interview, check how it was recorded: some setups put the interviewer on the left channel and the guest on the right, which is stereo worth keeping.
What Are the Telltale Signs of Poor MP3 Quality?
An over-compressed MP3 doesn't fail the way a low-resolution photo fails. It doesn't get uniformly "blurrier" — it develops specific, recognizable defects, and once you can name them, you'll hear them everywhere.
The classic artifact is watery, swishing treble. Cymbals, hi-hats, and applause turn into something like splashing or crinkling plastic, because high-frequency content is the first thing the encoder sacrifices when the budget runs out. Applause is the traditional torture test — thousands of tiny, random transients with no pattern for the psychoacoustic model to exploit. Sibilance is another victim: "s" and "t" sounds in vocals turn harsh or splashy.
The second signature is pre-echo — a faint, ghostly smear of a sound arriving just before the sound itself, most obvious on sharp attacks like snare hits or castanets. It happens because the encoder processes audio in frames and spreads its quantization error across the whole frame, including the milliseconds before the transient. Well-tuned encoders at decent bitrates suppress it; starving encoders can't.
You may also notice warbling sustained notes, a collapsed or smeared stereo image where wide recordings sound narrow and vague, and a general loss of "air" — the sense of space and sparkle in the top octave. Whether any of this matters depends entirely on playback. On closed-back studio headphones in a quiet room, a 128 kbps music file shows every one of these scars. On laptop speakers, in a car at highway speed, or in a gym, the environment masks them completely. Test on the device you'll actually use, and encode for that reality.
Above all, remember the one-way street: you cannot fix a badly encoded MP3 by re-encoding it at a higher quality. The data is gone. Every additional lossy pass only stacks new artifacts on old ones, which is also why you should never convert MP3 to MP3. If you hear artifacts, go back to the source video, extract again at the right setting, and keep the original until you've listened to the result.
How Do You Apply These Settings in an Online Converter?
Theory is useless until it survives contact with a real interface, so here's the full flow on a typical online converter — ExtractSound follows this same shape:
- Upload the video. Drag your MP4, AVI, or MOV file into the upload area. Because ExtractSound processes the file directly in your browser rather than shipping it to a server, the video never sits in someone's cloud storage — worth knowing when the content is private.
- Choose MP3 as the output format. If you're extracting for editing or archiving rather than listening, stop here and read the next section first.
- Pick a quality preset. Most converters offer three or four, labeled something like Standard, Good, and Best Quality. As a rule, these map to roughly 128, 192, and 320 kbps respectively — if the interface shows the underlying number anywhere (a tooltip, a details line), check it rather than trusting the label.
- Open the advanced settings. This is where everything from the previous sections plugs in: the CBR/VBR mode selector, the sample rate, and the channel option. Set VBR for listening, match the source sample rate, and switch to mono if it's single-mic speech.
- Convert, download, and listen before you delete anything. Play the result on the device it's meant for. If something sounds off, the source video is still there and re-extracting costs you a minute.
When you're standing at the quality dropdown, the whole decision compresses into this checklist:
- Speech from a single microphone → 96 kbps mono, VBR
- Music for everyday listening → 192–256 kbps VBR (the "Good" or "High" preset)
- Critical listening or a permanent library → 320 kbps or V0 (the "Best" preset)
- Source audio already compressed (AAC or Opus) → don't chase it with 320 kbps, but don't match the number exactly either; transcode a modest step above — 128 kbps AAC music → 160–192 kbps MP3, 96 kbps speech → 96–128 kbps MP3, mono if the source is mono
That last line needs explaining, because it's where people trip. AAC and MP3 bitrates are not the same currency: AAC is a newer, more efficient codec, so 128 kbps of AAC holds roughly what 160–192 kbps of MP3 holds. Matching the number exactly (128 → 128) quietly steps down in quality while also re-compressing already-compressed audio — the artifacts stack. Overshooting wildly (128 → 320) buys nothing, because MP3 can't restore detail that AAC already discarded. The modest step up sits between those two mistakes: enough headroom that the second lossy pass stays inaudible, not so much that you're paying for bits that store nothing.
How Do You Check the Source Audio Before You Convert?
Everything in this guide rests on one number you usually don't know yet: the bitrate of the audio track sitting inside your video. Guessing it is how people end up with 320 kbps MP3s containing 96 kbps sound. Checking takes under a minute, and once you've checked one file from a given source — your camera, your screen recorder, a particular website — the rest of the batch almost always matches.
The easiest way needs no installs, because you may already have it. Open the video in VLC Media Player, then go to Tools → Codec Information (Ctrl+J; on a Mac, Window → Media Information). Switch to the codec details and look at the audio stream. You'll see four things: the codec (AAC usually appears as "mp4a"; you might also see Opus, MP3, or PCM), the sample rate, the channel count, and the bitrate. That bitrate is your budget ceiling — the number every setting in the converter gets judged against. Here's what to do with each value:
- Codec. AAC ("mp4a") is the default in most MP4 and MOV files; Opus shows up in screen recordings and WebM files; PCM means uncompressed audio straight from a camera or recorder. Remember that AAC and Opus are more efficient than MP3 at the same bitrate — that's why the conversion rule below exists.
- Bitrate. The important one. If VLC shows nothing useful for a variable-rate stream, a free tool like MediaInfo gives you a precise read.
- Sample rate. Whatever it says — 48000 Hz for video, 44100 Hz for CD-sourced material — is what you set in the converter. Match it, never upsample it.
- Channels. A mono source converted to a stereo MP3 doubles the file size for zero gain.
Two examples of how this plays out. First: a music video whose audio stream reads mp4a, 128 kbps, 44100 Hz, stereo. AAC at 128 kbps holds roughly what a 160–192 kbps MP3 holds, so the sensible MP3 target is 160–192 kbps VBR. Jumping to 320 kbps doesn't restore anything AAC discarded — it doubles your file size to store damage that's already baked in. Dropping to 128 kbps MP3 runs a second, harsher lossy pass over the first one, and the cymbals will tell you about it.
Second: a recorded lecture whose stream reads 96 kbps, 48000 Hz, mono. The content is speech and the channel count is one, so the MP3 target is 96–128 kbps mono VBR at 48 kHz. A one-hour lecture comes out around 42–58 MB and sounds indistinguishable from the source track. Encoding it at 320 kbps stereo produces a file about 144 MB — more than three times the size, with literally zero audible benefit.
The rule that falls out of all this: you can't improve on the source, so don't try — but don't undershoot it either. If the stream is PCM (uncompressed), pick your MP3 setting purely by content: 96–128 kbps for speech, 192–256 kbps for music, 320 or V0 for archiving. If the stream is AAC or Opus, transcode at a modestly higher MP3 bitrate than the source number — roughly 1.25 to 1.5 times — so the second lossy pass stays inaudible: 128 kbps AAC music → 160–192 kbps MP3, not 320; 96 kbps speech → 96–128 kbps MP3, mono if the source is mono. And if the stream is already MP3, match its bitrate and accept the small extra loss — or better, keep the original file.
Sources
- Fraunhofer Institute for Integrated Circuits IIS — Claims about the origin, development, and psychoacoustic principles behind the MP3 format.
- The LAME Project — Information on high-quality VBR encoding standards (e.g., -V0) and the role of LAME as the de facto open-source MP3 encoder.
- FFmpeg Documentation — Technical specifications for audio codecs and parameters, backing claims about how converters handle different settings like bitrate and channels under the hood.
- Audacity Manual — Practical advice on identifying audio artifacts and understanding export settings, which corroborates the recommendations given in the article.
- International Organization for Standardization (ISO) — The formal standard for MP3 is ISO/IEC 11172-3 (MPEG-1 Audio Layer III). This source confirms its status as a formal international standard.