What It Means to Extract Audio from a Video File
Yesterday I watched a colleague spend 20 minutes trying to grab the soundtrack from a conference recording. She uploaded the whole 2GB video to three different websites, each promising to "convert" it to MP3. The third one worked, but she ended up with audio that sounded like it was recorded underwater. What she didn't know—and what most people don't realize—is that extracting audio from video isn't really converting anything. It's more like opening a suitcase and taking out just the shirt you need.
Does Extracting Audio Change My Original Video?
Your original video stays exactly as it was. Extracting audio creates a completely new file while leaving the source untouched. Think of it like photocopying a page from a book—you get your copy, but the book remains complete and unchanged on the shelf.
This matters because many people hesitate before extraction, worried they'll somehow damage their only copy of a precious video. You won't. The process reads the data from your video file and writes selected portions to a new file. Your computer treats the original as read-only during extraction, the same way it does when you're simply watching the video.
Even if the extraction fails midway—maybe your browser crashes or you accidentally close the converter—your video file remains intact. The worst outcome is that you need to start the extraction again. No data in the original file gets modified, moved, or deleted.
How Is Sound Stored Inside a Video File?
A video file works like a shipping container. The container itself—whether it's labeled MP4, MKV, or AVI—is just the outer box. Inside, you'll find separate compartments called streams. One stream carries the visual information, another carries the audio, and sometimes there are additional streams for subtitles or alternate language tracks.
These streams run parallel to each other, synchronized by timestamps. When you play the video, your media player reads both streams simultaneously, matching audio events to their corresponding visual moments. But here's the key insight: the audio already exists as a distinct entity. It's not mixed into the pixels or encoded into the visual data. It sits in its own dedicated stream, complete and self-contained.
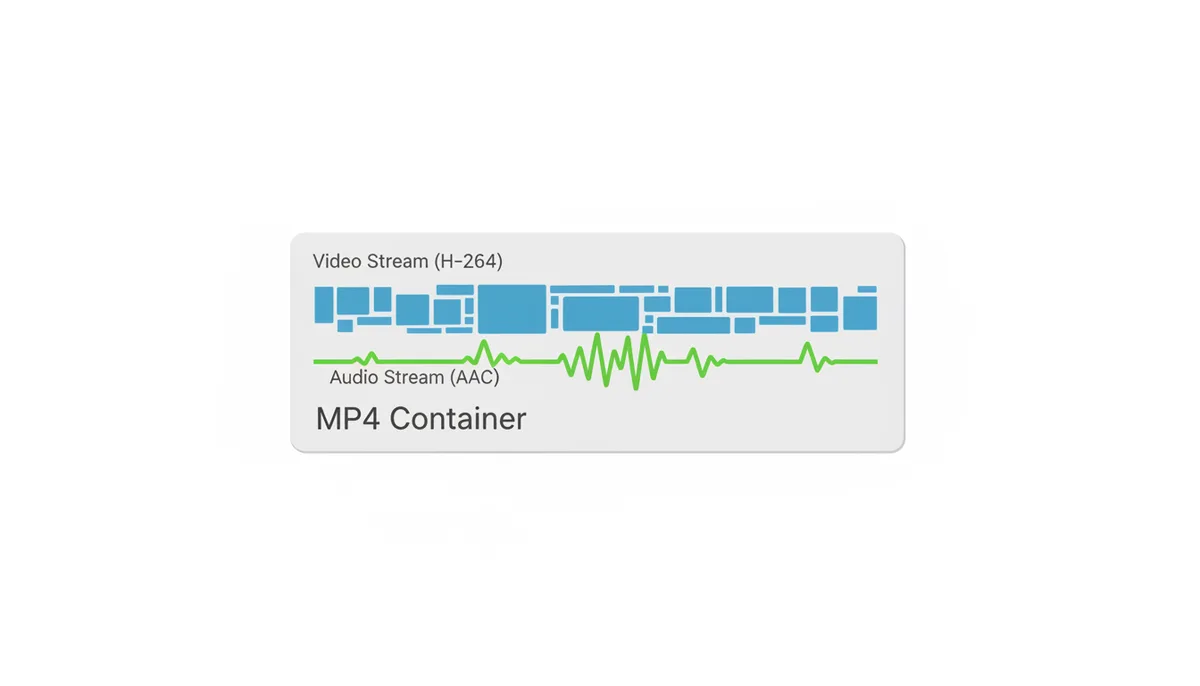
The audio stream itself contains sound data compressed using a specific codec—AAC in most MP4 files, AC3 in many movies, or Opus in newer web videos. This codec determines how the sound waves got converted into digital data. Understanding this separation explains why extraction is possible in the first place: we're not pulling sound out of pictures, we're copying data that was always separate.
What Actually Happens During Audio Extraction?
When you extract audio, your computer performs one of two operations: demuxing or transcoding. The choice between them determines both the speed of extraction and the quality of your result.
Demuxing works like carefully lifting a pre-wrapped gift out of a larger box. The software reads the container file, identifies the audio stream, and copies it byte-for-byte into a new file. If your video contains AAC audio, demuxing produces an AAC audio file. The process typically takes seconds even for hour-long videos because it's just copying data, not processing it. You get exactly the quality that was in the original—no better, no worse.
Transcoding involves unwrapping and rewrapping that gift. The software first decodes the audio stream back into raw waveform data, then re-encodes it using a different codec. Want MP3 from a video with AAC audio? That requires transcoding. The process takes longer because your computer must interpret every single audio sample and recalculate how to represent it in the new format.
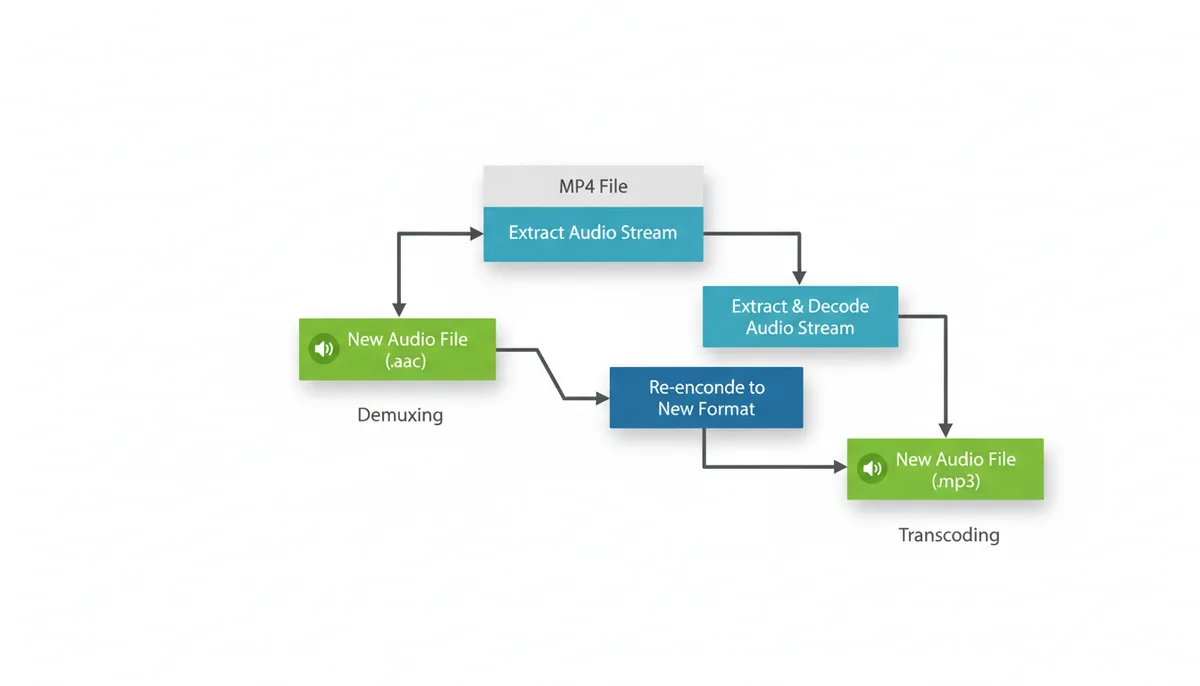
Most online converters transcode by default because MP3 remains the most universally compatible format. When you drop an MP4 file into a converter and select MP3 output, you're asking it to decode the AAC audio and create new MP3 data. This flexibility comes at a cost we'll explore next.
Why Does the Final Audio Quality Sometimes Sound Different?
Quality loss happens during transcoding, specifically when converting between lossy formats. Both AAC and MP3 use lossy compression—they achieve smaller file sizes by discarding audio information human ears supposedly won't miss. When you transcode from one lossy format to another, you're compressing already-compressed audio. It's like making a photocopy of a photocopy.
Bitrate directly controls this quality-versus-size tradeoff. Measured in kilobits per second (kbps), it represents how much data gets allocated to each second of audio. A 128 kbps MP3 uses 128,000 bits to represent each second, while a 320 kbps file uses two and a half times more data for the same duration. More data means more accurate representation of the original sound.
Here's where people make costly mistakes. If your video contains 128 kbps AAC audio and you transcode it to 320 kbps MP3, you don't get better quality. You get a larger file storing the same degraded audio. The information discarded during the original AAC encoding is gone forever. Setting a higher output bitrate can't recreate details that no longer exist.
The type of compression matters too. Lossy formats like MP3, AAC, and Opus achieve small file sizes by permanently removing data. Lossless formats like FLAC and ALAC compress audio like ZIP compresses documents—everything remains recoverable. WAV stores uncompressed audio, preserving everything at the cost of enormous file sizes. Converting from lossy to lossless gives you a perfect copy of the already-degraded audio, not a restoration of the original studio recording.
Is It Better to Copy the Audio or Re-compress It?
Copy when you can, transcode when you must. That's the rule professionals follow, and it should guide your decisions too.
Copying the stream through demuxing preserves absolute quality. If your video contains AAC audio and your device can play AAC files, demuxing gets you identical quality in the smallest possible file size. The extraction takes seconds and the result matches the original bit-for-bit. You can verify this yourself: demux the same file ten times and every copy will be identical down to the last byte.
Transcoding becomes necessary when you need specific compatibility. Maybe your car stereo only plays MP3s, or you're creating a podcast that requires consistent formatting. In these cases, you're making a deliberate trade—accepting some quality loss or larger file sizes in exchange for universal playback.
When you must transcode, use the highest practical quality settings. For MP3, that means 320 kbps for music or 192 kbps for speech. For AAC, you can achieve similar quality at about 75% of MP3's bitrate. But remember: transcoding to higher quality than your source just wastes space. Check your video's audio specifications first. Most streaming videos use 128-192 kbps audio, so transcoding to 320 kbps only inflates file size.
Which Audio Format Should I Choose for the Output?
Your intended use should drive format selection. Each format excels in specific scenarios and stumbles in others.
MP3 remains king for compatibility. Every device manufactured in the last 20 years can play MP3 files—phones, tablets, smart TVs, car stereos, even some refrigerators. At 192 kbps, MP3 sounds good enough for casual listening. At 320 kbps, most people can't distinguish it from the original. Choose MP3 when sharing files with others or when you're unsure about playback device capabilities.
AAC delivers better quality than MP3 at equivalent bitrates. Apple devices prefer it, and it's the standard for YouTube, streaming services, and most modern video files. A 192 kbps AAC file typically sounds clearer than a 256 kbps MP3. Use AAC when quality matters more than universal compatibility, especially for Apple ecosystems.
WAV files store uncompressed audio, preserving every detail at the cost of enormous file sizes—about 10 MB per minute. Audio editors and professional software prefer WAV because there's no decompression overhead during editing. Extract to WAV when you plan to edit, remix, or process the audio further.
FLAC offers lossless compression, typically reducing file sizes by 30-50% compared to WAV while maintaining perfect quality. Audiophiles and archivists choose FLAC for long-term storage. Use it when preserving original quality matters more than file size or compatibility.
| Format | Compression Type | Typical File Size | Quality | Compatibility | Best For |
|---|---|---|---|---|---|
| MP3 | Lossy | Small | Good | Universal | Sharing |
| AAC | Lossy | Small | Very Good | Widespread | Streaming |
| WAV | None | Very Large | Perfect | Universal | Editing |
| FLAC | Lossless | Large | Perfect | Limited | Archiving |
What's the Difference Between Online Converters and Desktop Software?
Online converters win on convenience. No installation, no updates, no compatibility worries. You open a webpage, drop in your file, and download the result. For extracting audio from a single wedding video or conference recording, they're perfect.
But convenience comes with trade-offs. Server-based converters require uploading your entire video file, which takes time and bandwidth. A 1GB video might take 20 minutes to upload on typical home internet. You're also trusting that server with your data—fine for public content, concerning for private recordings.
Browser-based tools like ExtractSound process files locally using JavaScript. Your video never leaves your computer, addressing privacy concerns while maintaining convenience. They work best for moderate file sizes, as browsers have memory limitations.
Desktop software like FFmpeg, Audacity, or VLC offers maximum control. You can specify exact codecs, bitrates, sample rates, and channel configurations. Batch processing lets you extract audio from hundreds of files overnight. Command-line tools seem intimidating but offer precision—you can extract just the rear left channel from a 5.1 surround sound track if needed.
| Tool Type | Accessibility | Installation | Processing Speed | Privacy | Feature Control | Cost |
|---|---|---|---|---|---|---|
| Online Converters (Server-Side) | Any device | None | Slow (upload required) | Low | Basic | Free with limits |
| Online Converters (Browser-Side) | Modern browsers | None | Fast | High | Moderate | Free |
| Desktop Software | Specific OS | Required | Fastest | Complete | Advanced | Free/Paid |
How Do I Choose the Right Bitrate and Sample Rate?
Bitrate selection depends on content type and quality requirements. For spoken content—podcasts, lectures, audiobooks—128 kbps provides clear, intelligible audio. You'll hear every word clearly while keeping file sizes manageable. Bump to 192 kbps if the recording includes music intros or background soundtracks.
Music demands higher bitrates. At 192 kbps, most casual listeners find the quality acceptable through typical headphones or speakers. Compression artifacts become noticeable mainly in complex passages with lots of instruments. At 256 kbps, only trained ears notice differences during critical listening. At 320 kbps, even audio engineers struggle to distinguish MP3 from the original in blind tests.
Sample rate determines temporal resolution—how many times per second the audio gets measured. CDs use 44.1 kHz, capturing frequencies up to 22.05 kHz (the limit of human hearing). Professional video often uses 48 kHz for compatibility with broadcast standards. Higher rates like 96 kHz or 192 kHz matter only for audio production, not playback.
Here's the critical principle: match your source material. If the video contains 44.1 kHz audio, set your output to 44.1 kHz. Converting to 48 kHz doesn't improve quality—it just makes the computer guess at information that doesn't exist. Similarly, if the original uses 192 kbps, encoding at 320 kbps wastes space without adding fidelity.
You can check these specifications before extracting. MediaInfo, VLC's codec information window, or even some online converters display source audio properties. Match or go lower, never higher than the source.
What If the Video Has Multiple Audio Tracks?
Modern videos increasingly contain multiple audio streams. A movie might include English, Spanish, and French dialogue tracks plus a director's commentary. Screen recordings often capture both system audio and microphone input as separate streams. Educational videos might offer tracks with and without background music.
Basic converters typically extract only the first audio track they encounter, which isn't always what you want. The French dub might be track one simply because tracks are ordered alphabetically. Professional tools let you choose specific tracks or extract all of them as separate files.
VLC media player helps identify tracks before extraction. Open your video, navigate to Audio > Audio Track, and preview each option. Note the language codes (en, es, fr) or descriptions (Commentary, Stereo Mix) displayed. Desktop extraction tools usually list tracks with these same identifiers.
When extracting from your own screen recordings, track selection becomes crucial. You might want just your narration (microphone input) without system sounds, or only the application audio without your voice. Good recording software labels these tracks during capture, making later separation straightforward.
Frequently Asked Questions
Is it legal to extract audio from any video?
It is legal to extract audio from videos you own or have the rights to. Extracting audio from copyrighted material you don't own, like commercial movies or music videos, for redistribution or commercial use is typically a copyright infringement. Personal use exists in a gray area—legally questionable but rarely prosecuted. When in doubt, extract only from content you created or have explicit permission to modify.
Can I extract just a specific part of the audio from a video?
Yes, but this usually requires a tool with trimming or editing capabilities. Many online converters and all desktop audio editors allow you to set start and end points before extracting, creating a clip rather than the full audio track. In Audacity, you'd import the full audio then select and export your chosen segment. This approach saves time and storage when you need just a quote or musical passage.
Will extracting audio remove the sound from the original video file?
No. The process is non-destructive. It creates a new, separate audio file, leaving your original video file completely untouched and with its sound intact. Even if you wanted to remove audio from a video, that would require a different process—remuxing the video stream without audio streams into a new container. Extraction is always additive, creating new files rather than modifying existing ones.
Why is my extracted MP3 file so much larger than I expected?
This happens if you choose a very high bitrate (like 320 kbps) when the original audio stream was a much lower bitrate. You are using more data to store the same quality, which inflates the file size without improving the sound. Check your source audio bitrate first. If the video uses 128 kbps audio, extracting at 320 kbps creates a file 2.5 times larger with zero quality benefit. The extra bits just store silence or duplicate information.
Can I convert the extracted audio back into a video?
Not directly. You would need video editing software to combine the audio file with a video stream (like a static image or another video) and create a new video file. This process, called muxing or multiplexing, reverses the extraction. Simple tools let you add audio to a still image, creating a video that displays one picture while playing your sound. Advanced editors enable synchronizing new audio with existing video footage.
What happens if I try to extract audio from a video that has no sound?
Most tools will either produce an error message stating there is no audio track to extract, or they will create a silent, empty audio file of zero or near-zero length. Professional software might complete successfully but warn that no audio stream was found. Silent videos are surprisingly common—security footage, certain animations, or corrupted files where video survived but audio didn't. Always preview a video before processing to confirm audio exists.
Making Informed Extraction Choices
Understanding audio extraction empowers better decisions. You know now that copying preserves quality while transcoding trades fidelity for compatibility. You can choose formats based on specific needs rather than defaulting to MP3 for everything. You recognize that higher settings than your source material waste space without improving quality.
Most importantly, you understand what's actually happening. Audio extraction isn't mysterious conversion magic—it's the logical process of reading data from one compartment of a container and writing it elsewhere. Whether you're archiving family videos, creating podcast content, or building a music library from concert recordings, you can approach extraction with confidence rather than crossing your fingers and hoping for the best.
The next time someone struggles with extracting audio, share what you've learned. They'll appreciate knowing their original files are safe, that quality depends on smart choices rather than expensive software, and that the "conversion" they've been attempting is often simpler than they imagined. Good audio extraction is less about finding the perfect tool and more about understanding what you're asking that tool to do.
What Are the Actual Commands and Steps for Extraction?
Let me show you exactly what happens when you extract audio from a 500MB conference recording. Using FFmpeg—the engine behind most converters—the basic extraction command looks like this: ffmpeg -i conference_talk.mp4 -vn -acodec copy output.aac
Breaking this down: -i specifies your input file, -vn tells FFmpeg to skip video streams entirely, and -acodec copy instructs it to copy the audio stream without re-encoding. On my laptop, this processes the 500MB file in about 3 seconds, producing a 31MB AAC file. The original video had 192 kbps stereo audio—exactly what we got out.
But what if you need MP3? The command changes to: ffmpeg -i conference_talk.mp4 -vn -acodec mp3 -ab 192k output.mp3. Now -acodec mp3 triggers transcoding, and -ab 192k sets the bitrate. This same file takes 45 seconds to process because FFmpeg must decode every audio frame from AAC and re-encode to MP3. The resulting file is 35MB—slightly larger because MP3 is less efficient than AAC at the same bitrate.
Real-world extraction often needs refinement. That conference video might start with 30 seconds of dead air while people get settled. Adding -ss 00:00:30 starts extraction at the 30-second mark. Need just the presenter's 20-minute segment from an hour-long recording? Add -t 00:20:00 to extract exactly 20 minutes. The full command becomes: ffmpeg -i conference_talk.mp4 -ss 00:00:30 -t 00:20:00 -vn -acodec mp3 -ab 192k presenter_segment.mp3
VLC offers a graphical alternative. Open your video, click Tools > Preferences, show All settings, find Input/Codecs > Demuxers > Demux module, and set it to "Demux audio only". Save preferences, restart VLC, and now it extracts audio whenever you use Convert/Save. The process takes longer than FFmpeg but requires no command-line knowledge.
Browser-based extraction works differently. When you drop a file into ExtractSound, JavaScript libraries parse the container structure directly in your browser's memory. The code identifies audio stream headers, calculates byte offsets, and reconstructs just the audio data into a new file. A 500MB video might use 2GB of browser memory during processing because JavaScript must load chunks into memory for manipulation. That's why browser tools often limit file sizes—not arbitrarily, but based on typical device memory constraints.
When Does Audio Extraction Fail Completely?
Extraction fails hard with encrypted content. Netflix downloads, iTunes purchases, and Amazon Prime videos use DRM (Digital Rights Management) that encrypts both video and audio streams. The data exists in the file, but it's scrambled. FFmpeg sees the container but can't decode the streams, typically throwing "Invalid data found when processing input" errors. No legitimate tool bypasses this encryption—that would violate both technical standards and law.
Corrupted files create different problems. I recently received a dashcam video where the recording stopped abruptly during a power loss. The file played its first 20 minutes fine, then froze. Audio extraction appeared to work but produced a file that cut off at 19:47. The container's index—the table of contents saying where each piece of data lives—was never written. Some recovery tools can scan the raw file and rebuild partial indices, but audio sync often drifts because timestamps are guesswork.
Variable bitrate (VBR) encoding trips up basic tools. Unlike constant bitrate files where every second uses identical storage, VBR allocates more bits to complex passages and fewer to silence. A song might use 320 kbps during the guitar solo but drop to 96 kbps during the quiet intro. Some converters report the average (maybe 192 kbps) but handle the variation poorly, producing audio that speeds up or slows down. Professional tools handle VBR correctly, but web converters sometimes assume constant bitrate and miscalculate durations.
Exotic codecs cause immediate failures. A colleague sent me drone footage with audio encoded in DTS (typically used for DVDs). Most online converters rejected it outright—they support AAC, MP3, and maybe Opus, but not cinema formats. Desktop FFmpeg handled it fine after installing additional codec libraries. The lesson: if extraction mysteriously fails with "unsupported format" errors, check what audio codec your video actually uses. MediaInfo reveals codec details that help diagnose why tools reject seemingly normal files.
Container mismatches create subtle issues. Sometimes phones or cameras write data incorrectly—putting AAC audio in an AVI container that traditionally uses MP3 or PCM. The video plays because players are forgiving, but extraction tools get confused. They expect certain audio formats in certain containers. Re-wrapping the file (remuxing to a proper MP4 container first) often solves these extraction failures.
How Much Does Professional Audio Extraction Actually Cost?
Free tools handle 95% of extraction needs perfectly well. But that last 5%—specialized formats, broadcast archives, multi-channel audio—sometimes demands professional software or services. Understanding these costs helps you decide when free tools suffice and when investing makes sense.
Adobe Premiere Pro includes sophisticated audio extraction, but at $23 monthly just for extraction seems excessive. However, if you're already editing video, its extraction preserves multitrack arrangements, surround sound positioning, and embedded metadata that free tools discard. It handles broadcast formats like ProRes with PCM audio that make FFmpeg struggle without additional configuration.
Professional transcription services charge $15-50 per hour when extracting audio includes human verification. They're not just running FFmpeg—they're ensuring dialogue remains intelligible, removing background noise, and splitting speakers into separate tracks. Court reporters needing legally admissible audio extraction might pay $200 per hour for certified services that document the complete chain of custody.
Batch processing changes the calculation entirely. Extracting audio from 1,000 training videos using online tools—even free ones—means clicking through interfaces 1,000 times. At 2 minutes per file, that's 33 hours of repetitive work. A $50 tool that processes folders automatically pays for itself immediately. FFmpeg scripts handle this free, but learning command-line syntax takes time that might cost more than purchasing user-friendly software.
Cloud services charge by processing time and storage. AWS MediaConvert extracts audio for $0.015 per minute of content. Processing those 1,000 hour-long videos costs $900 plus storage. But it handles any format, scales infinitely, and integrates with existing workflows. For businesses processing customer uploads continuously, these services make more sense than maintaining conversion servers.
The hidden cost is often time, not money. I watched a nonprofit spend days trying to extract clear audio from poorly recorded interviews using free tools. A $200 audio restoration plugin would have saved a week of frustration. Consider your hourly value—if spending $50 saves two hours of trial-and-error with format compatibility, you're ahead.
Sources
- FFmpeg — The technical explanations of demuxing, transcoding, codecs, and containers, as FFmpeg is the underlying engine for most audio/video manipulation.
- Xiph.Org Foundation — The definitions and benefits of lossless (FLAC) vs. lossy (MP3, AAC) audio formats and codecs.
- VideoLAN Organization (VLC) — Information on the wide variety of container formats (MP4, MKV, etc.) and the concept of multiple audio tracks within a single file.
- Audacity — Practical explanations of audio concepts like bitrate, sample rate, bit depth, and audio channels (mono/stereo).
- Moving Picture Experts Group (MPEG) — The origin and standards for formats like MP4 (MPEG-4 Part 14) and MP3 (MPEG-1 Audio Layer III), establishing them as international standards.